



Part 3 — How a project runs
Part 3 — How a project runs
Section titled “Part 3 — How a project runs”6. Intake and scope
Section titled “6. Intake and scope”Every project, whatever its scope, starts with the same two steps. After that the workflow branches based on what we have been hired to do.
6.1 Intake
Section titled “6.1 Intake”When a lead comes in and is moved to the job walk stage of our CRM — our customer relationship management system — a Project Record is created in KI. Project and client information transfers into the Project Record automatically, along with the Division the project belongs to. The CRM today is Active Campaign, though we may move to another one; what transfers is the client contact information, the project address, and some project budget information.
Two things follow from this. The Project Record exists from the job walk onward — before anything is won — and it is the same record for the life of the job. There is no separate pre-sales object that later converts into something else.
Treat the CRM as a replaceable source. The fields that arrive — contact information, project address, and some project budget information — are the contract; Active Campaign is the current provider of them, not a fixed dependency.
One consequence worth knowing before you rely on the numbers: an inquiry that never converts leaves no pre-sale record in the Admin Portal. Priority, likelihood, target dates and the Lead Champion are Legacy KI attributes with no Admin Portal equivalent, and the pipeline board is a Legacy KI screen. If you are working a pipeline rather than a design conversation, that is where you are working. Close rate and loss reasons are not something the Admin Portal can currently answer.
6.2 Scope
Section titled “6.2 Scope”Next we determine the project scope, because scope decides the workflow. Six scopes exist:
- Design Build — our primary scope, and the workflow described in full below; the other five are covered in section 6.3.
- Design Only
- Build Only
- Interiors Only
- Furniture Only
- Story Select
The other five scopes each run their own workflow. They are documented in section 6.3 below. Design Build remains the reference workflow, and the rest of Part 3 describes it in full; where another scope differs, section 6.3 says how.
6.3 The other five scopes
Section titled “6.3 The other five scopes”Each of the five remaining scopes uses the same objects, financial rules, and interfaces as Design Build. What changes is the contract set and the phase sequence. The steps below are the tracker steps a project team actually sees in the Admin Portal.
Design Only. The design side of Design Build on its own. There is one contract — the Design Contract — and no Construction Contract, so no construction budget and no construction billing schedule. The design phases run exactly as they do in Design Build, as-builts included; only the Build Phase is absent:
-
Project Proposal — review and approve the Project Proposal, sign the Design Contract, pay the design deposit.
-
Visioning — complete the visioning questionnaires, schedule the as-built site visit, schedule the design kick-off meeting, schedule the visioning presentation, review and approve the visioning presentation.
-
Final Design — schedule the finish presentation and plan update, hold any showroom visits, schedule the final design presentation, review and approve the Final Design Package.
After the Final Design Package is approved the design engagement is complete; there is no construction deposit, kickoff, or Build activity.
Build Only. Construction without the design engagement in front of it. There is one contract — the Construction Contract — and it is the first step rather than the third, so the Contract Activation Sequence runs at the start of the project. There is no design phase, but the final design documents still have to be entered so the field has something to build from.
-
Project Proposal — review and approve the proposal, sign the Construction Contract, pay the construction deposit. The Contract Activation Sequence in section 8 runs here.
-
Final design documents — enter the plans, specifications, and selections the client is bringing in, so the Final Design tab is current for the Field App.
-
Build — Construction Kickoff, then the ongoing activity described in section 12.
Because the construction budget and billing schedule are set up at the start, Cost Control and billing behave the same as they do in Design Build from day one.
Interiors Only. The interiors design engagement on its own, running three design phases under a Design Contract. The phases are named as they are in Design Build, but the tracker is shorter: there is no as-built site visit in Visioning. The steps are:
-
Project Proposal — review and approve the Project Proposal, sign the Design Contract, pay the design deposit.
-
Visioning — complete the visioning questionnaires, schedule the design kick-off meeting, schedule the visioning presentation, review and approve the visioning presentation.
-
Final Design — schedule the finish presentation and plan update, hold any showroom visits, schedule the final design presentation, review and approve the Final Design Package.
Each step gates the next in the usual way, and the client sees the same approval sequence in the Client Portal.
Furniture Only. Furniture procurement, priced proposal by proposal. At the start the project carries a design price and a furniture budget. From there, multiple Furniture Proposals can be uploaded and approved, each with its own design price. The only contract on this scope is the Design Contract, and it behaves exactly like a Design Contract anywhere else: Billing Items, an initial Budget Adjustment, a deposit, and the same balancing equations. The furniture proposals themselves carry no contract, no invoice, and no change orders — furniture purchasing and billing are handled outside KI. Most of the ongoing construction functionality — schedule milestones, safety, purchase orders against a construction budget — is not used. Its phases are:
-
Project Proposal — review and approve the Project Proposal, sign the Design Contract, pay the design deposit.
-
Design Discovery — complete the furniture visioning form, schedule the Design Discovery presentation, review and approve the Design Discovery presentation.
-
Final Proposal — schedule the finish presentation and plan update, hold any furniture selection meetings, review and approve the Final Proposal.
The Design Contract is subject to every rule in Part 2, including the two balancing equations in section 5.1. What sits outside those rules is the furniture itself: because approved Furniture Proposals are not billed through KI, they never appear in a billing schedule or a Cost Code budget.
Story Select. The abbreviated path. A hard price is given at the very beginning covering design and construction together in a single contract, so there is no separate design price and construction price and no second Contract Activation Sequence later. The design work is shortened to showroom visits and one final design presentation before construction starts. Project financials and project management run the same as Design Build. Its phases are:
-
Project Proposal — review and approve the Project Proposal, sign the contract, pay the deposit.
-
Final Design — hold any showroom visits, then review and approve the Final Design Package.
-
Build — Construction Kickoff, then the ongoing activity described in section 12.
The combined price is the thing to watch on this scope: one contract amount covers design and construction, so the budget behind it has to carry both.
7. Design Build: the four phases
Section titled “7. Design Build: the four phases”A Design Build project runs through four phases. All four are visible to the client in the Client Portal, and each ends at a gate that must close before the next phase begins.
| Phase 1 Project Proposal | Phase 2 Visioning | Phase 3 Final Design | Phase 4 Build | |
|---|---|---|---|---|
| What happens | Proposal PDF uploaded; budgets built by Cost Code; client approves; Design Contract signed; Billing Items, budget, deposit invoice | Questionnaires; as-builts; design kick-off meeting; visioning presentation; budget update | Finish presentation; showroom visits; final design package; Construction Contract signed; Billing Items, budget, deposit invoice | Construction kickoff; project updates; schedule; issues; safety; pay applications; change orders |
| What the client does | Reviews, comments, approves; signs the Design Contract; pays the deposit | Reviews and approves the visioning package | Approves the final design; signs the Construction Contract; pays the deposit | Shifts from approvals to updates, invoices, and issues |
| Gate | Design Contract signed and deposit paid | Visioning package approved and construction budget updated | Construction Contract signed and deposit paid | None — Build runs to project completion |
There is no Schematic Design phase and no Design Development phase. Those are standard architectural stages and they turn up in older documents, but they are not phases KI tracks. The four above are the sequence the Project Progress Tracker moves a project through.
7.1 Working inside a project
Section titled “7.1 Working inside a project”Open a project by searching projects within its Division. The project home page is your control panel: assign the team, and run the project from there.
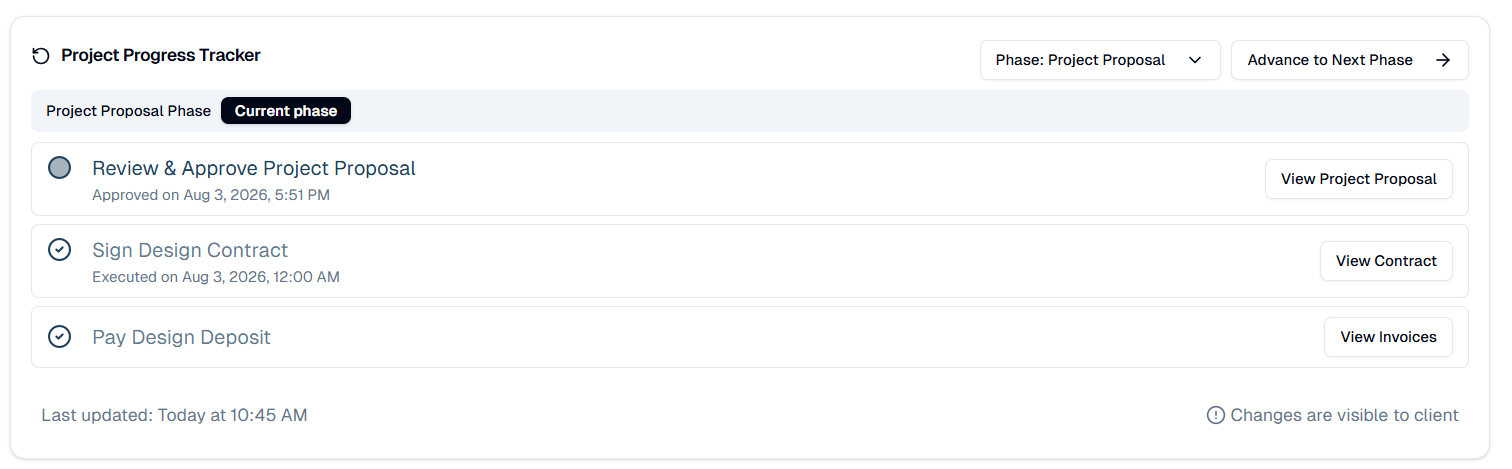
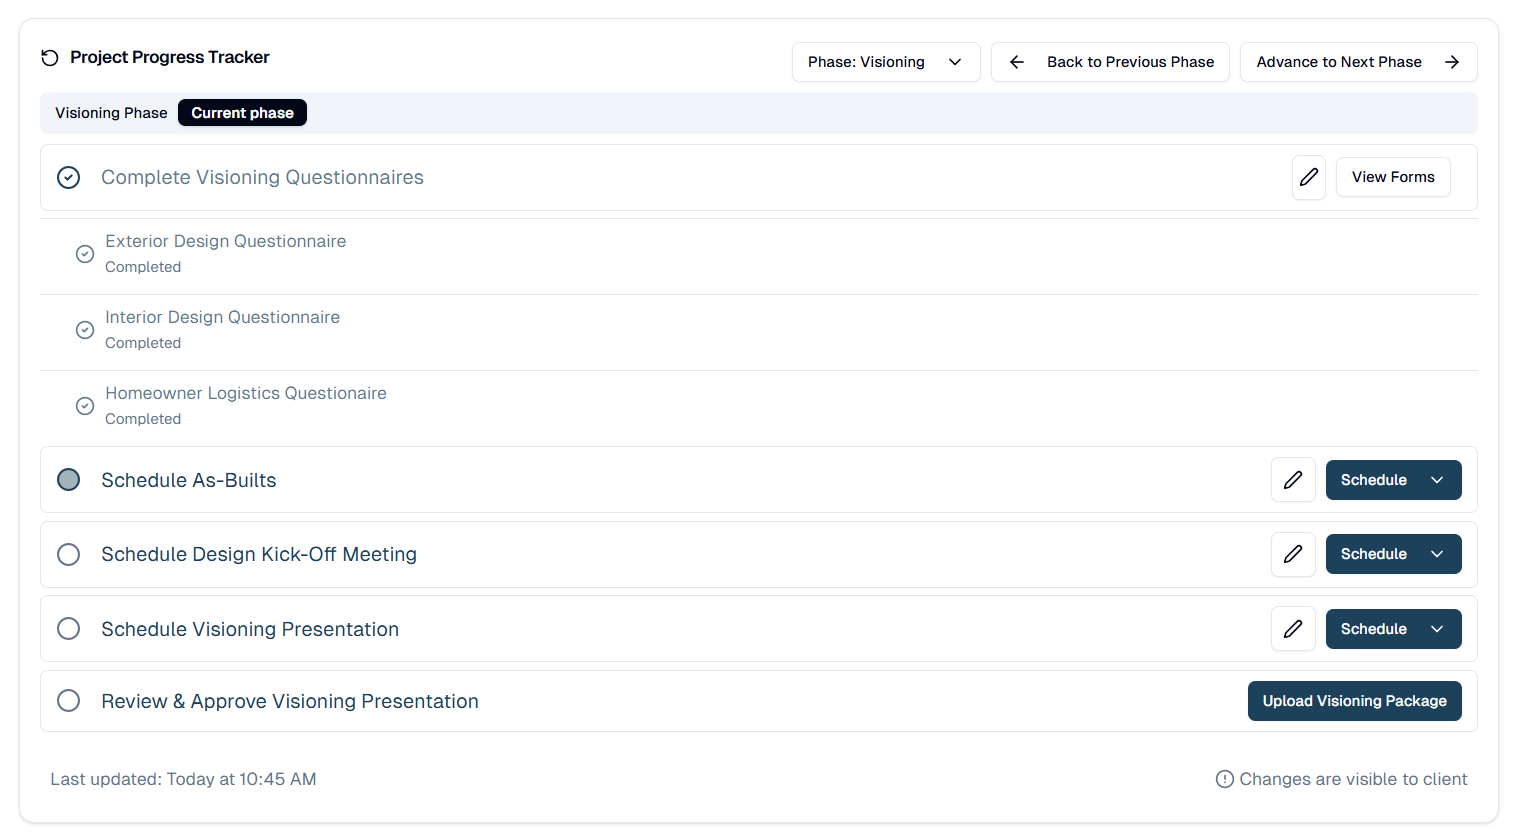
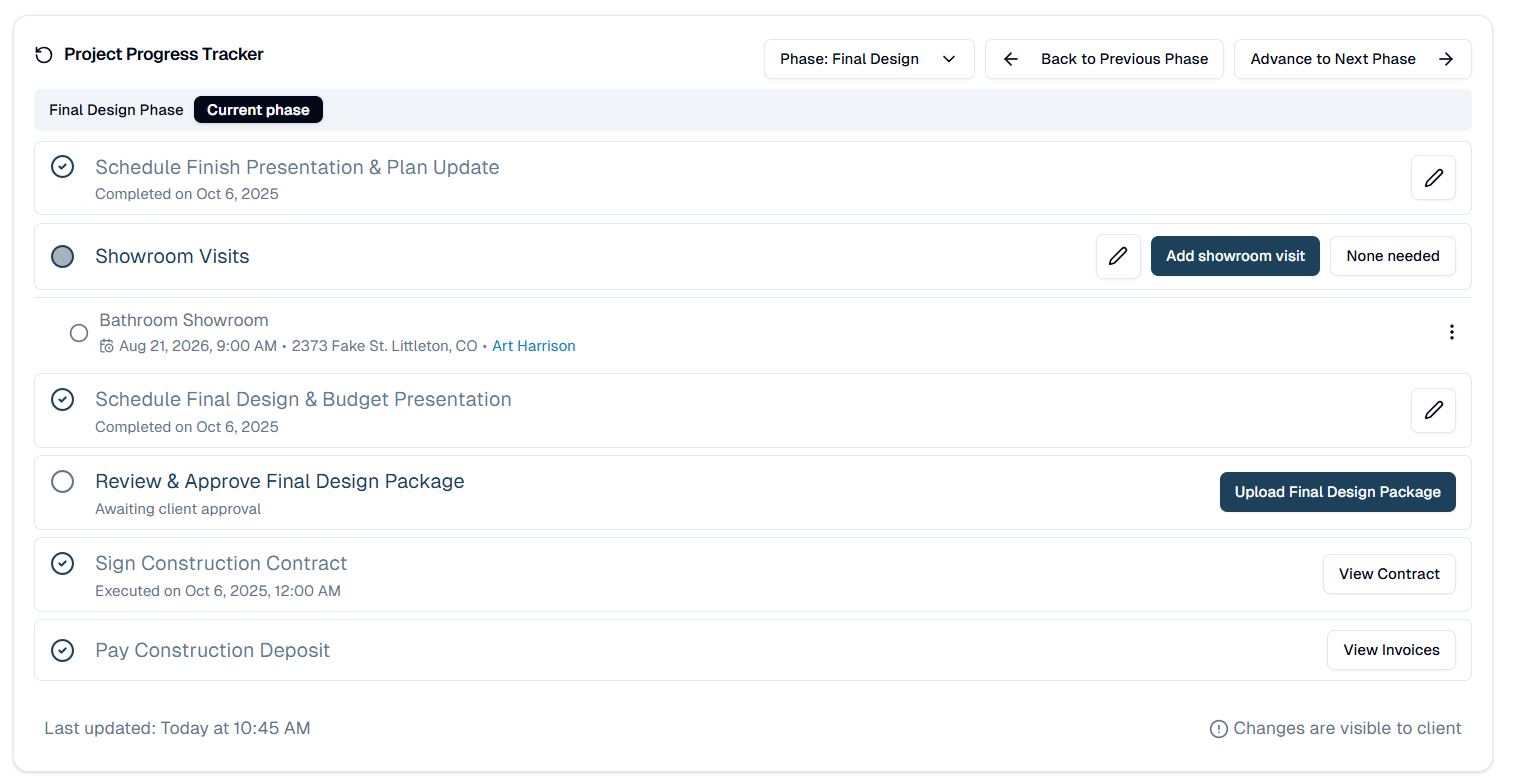
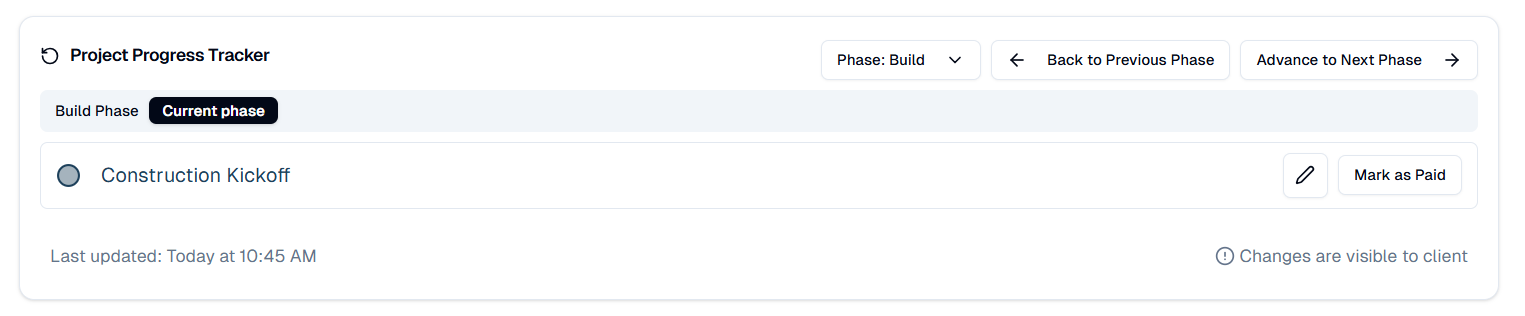
Work happens through the Project Progress Tracker, which lists the tasks for the current phase. Each task is actioned according to its type — schedule it, mark it complete, assign it, or upload to it. The tracker carries a phase selector plus Advance to Next Phase and Back to Previous Phase controls, shows when it was last updated, and states plainly that changes are visible to the client.
At the top of every project is a Communications tab showing every message the system has sent the client, including whether each one was delivered successfully and whether it was opened.
7.2 The project team
Section titled “7.2 The project team”Four roles are assigned to a project and shown to the client in the Client Portal:
| Role | What they do |
|---|---|
| Project Planner | Owns the financials of the project — pricing, procurement, margin, and change orders |
| Design Manager | Owns the design process through its phases |
| Site Manager | Runs the work on site |
| Interior Designer | Produces the design |
The client is the fifth party to a project; vendors and subcontractors are counterparties reached through the Vendor Portal.
Naming note. The role that owns project financials is the Project Planner. The Admin Portal and Client Portal still display Planning Manager, which is a known defect rather than a second valid name. The Design Manager is sometimes called the Design PM; Design Manager is the name to use.
The client is called the owner on some screens. It is the same party, and the word comes from construction convention, where whoever is paying for the work owns the building.
8. The Contract Activation Sequence
Section titled “8. The Contract Activation Sequence”This four-step sequence runs every time a contract is signed, whatever the scope. On a Design Build project that means twice — once for the Design Contract in the Project Proposal Phase, and again for the Construction Contract in the Final Design Phase. It appears twice in this guide because on that scope you will perform it twice; the mechanics are identical both times. Scopes with a single contract run it once, when that contract is signed (section 6.3).
- Sign the contract. Added in the Admin Portal, then signed digitally by the client in the Client Portal. The contract itself is drafted and edited outside KI and uploaded as a PDF; KI captures the client’s e-signature against that PDF and records what is needed to make it valid in the database.
- Set up Billing Items. Define how the contract will be billed. The sum of all Billing Items must equal the contract amount, and one item is the deposit.
- Set up the budget. Do the initial Budget Adjustment by Cost Code — the budget for every cost on the job. The Fee is not a budget adjustment, so Cost Code budgets plus Fee must equal the contract amount.
- Bill the deposit. Create a Pay Application and submit the invoice. The client is emailed and can view and pay it in the Client Portal.
Until all four steps are complete, the project cannot advance to the next phase. This is a hard gate, not a convention.
9. Phase 1 — Project Proposal
Section titled “9. Phase 1 — Project Proposal”Goal of this phase: get an approved proposal, a signed Design Contract, and a paid deposit, so the project can start design work.
Everything the client sees in this phase — the proposal PDF, its revisions, the contract to sign, the invoice to pay — is published to the Client Portal from the Admin Portal.
-
Upload the proposal. In the Admin Portal, upload the proposal PDF and enter the Design Price and Construction Budget. The PDF combines marketing and sales content with project-specific content, including construction pricing — which at this stage we call budgets rather than prices, because the design is not yet fixed.
-
Where the pricing comes from. Construction budgets are still built in Legacy KI, where they are called proposals and sit under leads. They are created as Estimates, broken out by Cost Code with markups applied, and generate the PDFs that are combined into the overall proposal uploaded above.
-
Two PDFs, and the difference matters. Every Estimate generates a Proposal (No Spread), which is logged internally and never emailed, and a Proposal with spreading enabled, which is the client-facing document. Spreading distributes general conditions, general requirements, supervisory labour and markup into the line items rather than showing them as separate rows. Check which one you are attaching before you send anything by hand.
-
Client review. Once the client receives the proposal they can approve it or comment on it in the Client Portal. Multiple revisions can be uploaded until one is approved. Uploading happens in the Admin Portal, and earlier versions remain visible to the client. Both outcomes are recorded: an approval carries who approved it and when, and a rejection captures the client’s reason in their own words, which feeds the next revision.
-
Design Contract. Once the proposal is approved, add the Design Contract in the Admin Portal. It then becomes available in the Client Portal for the client to sign digitally.
-
Scope of this contract. This first contract covers design only, even though the proposal it came from also contains a construction budget. The Construction Contract comes later, at the end of the Final Design Phase.
-
Contract Activation Sequence. Billing Items, then the initial Budget Adjustment, then the deposit invoice — see section 8.
-
Exit criteria. Once the client has signed the Design Contract and paid the deposit, the project moves to the Visioning Phase.
Tracker tasks in this phase: Review & Approve Project Proposal · Sign Design Contract · Pay Design Deposit.
Proposals email from proposals@knottyiron.com and carry a single office phone number. That address is a leftover from the name KI used to carry; see the FAQ. If a client replies to a proposal and the address looks unfamiliar, that is why.
10. Phase 2 — Visioning
Section titled “10. Phase 2 — Visioning”Goal of this phase: gather what the design team needs to know, then present a design direction the client approves. The phase ends with an approved visioning package and an updated construction budget.
Scheduling and uploading happen in the Admin Portal; the client sees, comments, and approves in the Client Portal.
-
Visioning questionnaires. The Design Manager assigns questionnaires to the client through the Visioning Questionnaire task in the Admin Portal. The client fills them out to give the design team the background it needs, and the design team reviews the responses in the Admin Portal. The forms themselves live in the Forms module (section 17). The standard set is the Exterior Design Questionnaire, the Interior Design Questionnaire, and the Homeowner Logistics Questionnaire.
-
As-builts. Schedule the as-built site visit in the Admin Portal; it displays for the client in the Client Portal. The goal of this step is accurate measurements and a documented record of existing conditions.
-
Design Kick-Off Meeting. The design team schedules a Design Kick-Off Meeting with the client, in person or over Teams, to talk through the project. This is often the first time the project design team meets the client face to face.
-
Visioning Presentation. Scheduled in the Admin Portal and viewable in the Client Portal. The team uploads a visioning package PDF that typically includes proposed floor plans, inspirational imagery, renderings, exterior elevations, and an updated construction proposal covering any budget movement — anything needed to update the client on progress and collect feedback on the design direction. The client can view, comment on, and approve the PDF, and multiple revisions can be uploaded.
-
Exit criteria. The phase ends with an approved visioning package and an updated construction budget.
11. Phase 3 — Final Design
Section titled “11. Phase 3 — Final Design”Goal of this phase: lock the design and the price, then get the Construction Contract signed and its deposit paid. This is where interior finishes are settled, the drawing set is completed, and the construction number moves from budget to final price.
-
Finish presentation and plan update. The first real in-depth look at the interior design and finish direction, including the tile, fixtures, paint, hardware and cabinetry the job will be built from. Architecturally, the plans are also updated as the design progresses, but there is no budget update at this step. Schedule the meeting in the Admin Portal; it displays in the Client Portal.
-
Showroom visits. The Design Manager adds and schedules showroom visits in the Admin Portal, and the client sees them in the Client Portal. Showroom visits are managed entirely in the Admin Portal, including adding more, marking them to be redone, completing them, or recording that none are needed. Each visit carries a date, time, address, and a named contact.
-
Final design package. One or more PDFs containing the complete drawing set and the final price. It is typically presented in person, but it is uploaded through the Admin Portal and viewed, commented on, and approved in the Client Portal. It can go through many revisions.
-
Construction Contract. Once the final design package is approved, add the Construction Contract in the Admin Portal. It then becomes available in the Client Portal for the client to sign digitally.
-
Contract Activation Sequence. Billing Items, then the initial Budget Adjustment, then the deposit invoice — see section 8. This is that contract’s own billing schedule and its own budget; the Design Contract’s are untouched.
-
Exit criteria. Once the client has signed the Construction Contract and paid the deposit, the project moves to the Build Phase.
12. Phase 4 — Build
Section titled “12. Phase 4 — Build”The Build Phase has only one scheduled milestone step: the Construction Kickoff, scheduled in the Admin Portal. From there the phase is driven by ongoing activity rather than discrete approvals — project updates, schedule milestones, issues, safety inspections, invoicing, and change orders. Those are covered in section 13.
The client’s experience also changes at this point, from a sequence of approvals to a stream of updates.
Build has no exit gate, and Build is the last phase: there is no closeout phase in KI today. It runs to project completion. Punch-list work is handled inside this activity rather than as a separate stage: remaining defects and unfinished items are logged as Issues of type quality and tracked until closed. There is no separate punch list record in KI.
Where each area is documented in detail
Section titled “Where each area is documented in detail”Parts 1 to 4 describe KI by how it is organised — the objects, the rules, and the interfaces. The pages below describe the same system by the business area each part serves, which is the faster route when you already know what you are trying to do.
| Area | What it does |
|---|---|
| Leads and intake | First contact through to a won project, with meetings and visioning forms along the way |
| Estimating and proposals | The priced build-up, the client-facing proposal, and how approval is recorded |
| Design | The phased design process from visioning through final design |
| Contracts and change orders | The contracts, priced changes, and the Billing Items behind them |
| Budgets and cost control | What the work is expected to cost, what it has cost, and where it is heading |
| Billing and accounting | Pay applications, vendor invoices, and the QuickBooks tie |
| Purchasing and vendors | Purchase orders and the vendor-facing views that go with them |
| Scheduling | Project milestones, with history as dates move |
| Field operations | The daily site record and labour time |
| Communication and documents | Issues, project updates, and the documents shared with the client |
| Projects, teams, and contacts | Project setup, who is assigned, and the contact directory |